博客主机_自动申请续期免费证书

一不留神,之前的域名证书过期了。由于是Let’s Encrypt免费证书,需要3个月手工续期一次,一年就得4次,还是有点麻烦,搞成自动化多好。
以下操作均在服务器上执行(ubuntu16,腾讯云)

以下内容已过期(废弃),最新方式参考最后一部分“使用snap方式的certbot”

下载脚本certbot-auto

1
2
3
cd opt/
wget https://dl.eff.org/certbot-auto
chmod a+x certbot-auto

执行certbot-auto可能报错:

1
An unexpected error occurred: UnicodeEncodeError: 'ascii' codec can't encode

说明脚本尝试修改nginx配置文件,结果文件中包含中文字符。这个本人更倾向于自主控制,不依赖脚本,脚本复仅仅负责生成证书或renew证书即可,证书的复制和配置还是人工脚本完成更佳。一方面可控性更强,另一方面遇到错误也知道怎么回事!

生成秘钥

命令

1
./certbot-auto certonly  -d *.example.cn --manual --preferred-challenges dns --server https://acme-v02.api.letsencrypt.org/directory
  1. certonly 安装模式
  2. -d 申请证书的域名,如果是通配符域名输入 *.example.cn
  3. –manual 手动安装插件
  4. –preferred-challenges dns 使用 DNS 方式校验域名所有权
  5. –server,Let’s Encrypt ACME v2 版本使用的服务器不同于 v1 版本,需要显示指定

响应

1
2
3
4
5
6
7
8
9
10
11
12
13
14
15
16
17
18
19
20
21
22
23
24
25
26
27
28
29
30
31
32
33
34
35
36
37
38
39
40
41
42
43
44
Requesting to rerun ./certbot-auto with root privileges...
./certbot-auto has insecure permissions!
To learn how to fix them, visit https://community.letsencrypt.org/t/certbot-auto-deployment-best-practices/91979/
Saving debug log to /var/log/letsencrypt/letsencrypt.log
Plugins selected: Authenticator manual, Installer None
Obtaining a new certificate
Performing the following challenges:
dns-01 challenge for example.cn

- - - - - - - - - - - - - - - - - - - - - - - - - - - - - - - - - - - - - - - -
NOTE: The IP of this machine will be publicly logged as having requested this
certificate. If you're running certbot in manual mode on a machine that is not
your server, please ensure you're okay with that.

Are you OK with your IP being logged?
- - - - - - - - - - - - - - - - - - - - - - - - - - - - - - - - - - - - - - - -
(Y)es/(N)o: y

- - - - - - - - - - - - - - - - - - - - - - - - - - - - - - - - - - - - - - - -
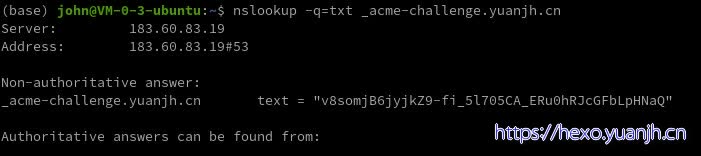
Please deploy a DNS TXT record under the name
_acme-challenge.example.cn with the following value:

v8somjB6jyjkZ9-fi_5l705CA_ERu0hRJcGFbLpHNaQ#配置dns的txt解析

Before continuing, verify the record is deployed.
- - - - - - - - - - - - - - - - - - - - - - - - - - - - - - - - - - - - - - - -
Press Enter to Continue
Waiting for verification...
Cleaning up challenges
Subscribe to the EFF mailing list (email: xxxxx(your email)@163.com).

IMPORTANT NOTES:
- Congratulations! Your certificate and chain have been saved at:
/etc/letsencrypt/live/example.cn/fullchain.pem
Your key file has been saved at:
/etc/letsencrypt/live/example.cn/privkey.pem
Your cert will expire on 2021-02-20. To obtain a new or tweaked
version of this certificate in the future, simply run certbot-auto
again. To non-interactively renew *all* of your certificates, run
"certbot-auto renew"
- If you like Certbot, please consider supporting our work by:

Donating to ISRG / Let's Encrypt: https://letsencrypt.org/donate
Donating to EFF: https://eff.org/donate-le

以上命令需要注意2点
1,最好在部署服务的机器上执行
2,第二步需要修改dns记录,但是修改后未必实时生效,需要等到生效后再按“回车”,否则可能会生成失败

腾讯云的dns配置样例

验证dns解析生效的命令

1
2
# 域名为解析的二级域名
nslookup -q=txt _acme-challenge.example.cn

返回如下信息说明配置生效了

生成的秘钥

1
2
3
4
5
6
7
(base) john@VM-0-3-ubuntu:~$ sudo ls -lh /etc/letsencrypt/live/example.cn
总用量 4.0K
lrwxrwxrwx 1 root root 33 Nov 22 16:25 cert.pem -> ../../archive/example.cn/cert1.pem
lrwxrwxrwx 1 root root 34 Nov 22 16:25 chain.pem -> ../../archive/example.cn/chain1.pem
lrwxrwxrwx 1 root root 38 Nov 22 16:25 fullchain.pem -> ../../archive/example.cn/fullchain1.pem
lrwxrwxrwx 1 root root 36 Nov 22 16:25 privkey.pem -> ../../archive/example.cn/privkey1.pem
-rw-r--r-- 1 root root 692 Nov 22 16:25 README

配置nginx

样例

1
2
3
4
5
6
7
8
9
10
11
12
13
14
15
16
server {
listen 443 ssl;
server_name localhost;

location / {
root html;
index index.html index.htm;
}
ssl on;
ssl_session_timeout 5m;
ssl_protocols TLSv1 TLSv1.1 TLSv1.2;
ssl_ciphers ALL:!ADH:!EXPORT56:RC4+RSA:+HIGH:+MEDIUM:+LOW:+SSLv2:+EXP;
ssl_prefer_server_ciphers on;
ssl_certificate /etc/letsencrypt/live/example.cn/fullchain.pem;# 若使用cert.pem虽证书有效,但浏览器依然会提示不安全
ssl_certificate_key /etc/letsencrypt/live/example.cn/privkey.pem;
}

修改后验证nginx:sudo nginx -t
验证ok后重启nginx:sudo service nginx restart
登录自己站点,点击地址栏的锁图标,可以发现证书已经生效
登录腾讯云等站点添加新的证书(公钥fullchain.pem和私钥privkey.pem),在去cdn里面关联各域名。

自动续期

免费的证书必须3个月续期1次,比较麻烦,可以添加定时任务脚本进行自动续期

1
2
touch sslrenew.sh
chmod +x sslrenew.sh

sslrenew.sh内容

1
<path to certbot>/certbot-auto renew

配置定时任务

1
2
3
编辑定时任务:crontab -e
0 0 1 * * /home/john/opt/sslrenew.sh #每月1日
查看定时任务:crontab -l

异常报错

httpConnection

原因:域名被墙
解决:手工配置dns

1
2
3
4
5
cat >> /etc/hosts <<EOF

# https://community.letsencrypt.org/t/ocsp-int-x3-letsencrypt-org-is-not-working-in-china/118552/7
96.17.68.81 ocsp.int-x3.letsencrypt.org
EOF

rerun xxx with root privileges


原因:需要sudo权限
解决:sudo xxxx.sh

your system is not supported by certbot-auto anymore


原因:certbot-auto不再支持所有的操作系统!根据作者的说法,certbot团队认为维护certbot-auto在几乎所有流行的UNIX系统以及各种环境上的正常运行是一项繁重的工作,加之certbot-auto是基于python 2编写的,而python 2即将寿终正寝,将certbot-auto迁移至python 3需要大量工作,这非常困难,因此团队决定放弃certbot-auto的维护。

既然如此,现在我们还能继续使用certbot吗?certbot团队使用了基于snap的新的分发方法。

参考下一章,使用snap方式的certbot

使用snap方式的certbot

安装snap

1
apt-get install snapd -y

安装snap版本前,需要先卸载干净旧的,由于本人之前就是绿色方式安装,所以不需要卸载。

1
2
3
4
# 以下参考https://certbot.eff.org/lets-encrypt/ubuntuxenial-nginx(选择nginx,ubuntu16)
sudo snap install core; sudo snap refresh core
sudo snap install --classic certbot
sudo ln -s /snap/bin/certbot /usr/bin/certbot

生成证书

1
2
3
4
5
sudo certbot certonly -d *.xxx.cn  --manual --preferred-challenges dns --server https://acme-v02.api.letsencrypt.org/directory 
#期间需要将修改域名dns作为验证域名所属的方式
配置好dns后,continue,之前。
执行 nslookup -q=txt _acme-challenge.example.cn
确保域名解析已生效

有如下提示说明成功

1
2
3
4
5
6
7
8
9
10
11
12
13
14
15
16
17
18
19
Before continuing, verify the record is deployed.
- - - - - - - - - - - - - - - - - - - - - - - - - - - - - - - - - - - - - - - -
Press Enter to Continue
Waiting for verification...
Cleaning up challenges

IMPORTANT NOTES:
- Congratulations! Your certificate and chain have been saved at:
/etc/letsencrypt/live/xxx.cn/fullchain.pem
Your key file has been saved at:
/etc/letsencrypt/live/xxx.cn/privkey.pem
Your certificate will expire on 2021-05-20. To obtain a new or
tweaked version of this certificate in the future, simply run
certbot again. To non-interactively renew *all* of your
certificates, run "certbot renew"
- If you like Certbot, please consider supporting our work by:

Donating to ISRG / Let's Encrypt: https://letsencrypt.org/donate
Donating to EFF: https://eff.org/donate-le

配置crontab

1
0 0 1 * * sudo certbot renew

如果renew失败,则可依照之前步骤,老老实实按新申请的流程走
其余就是修改nginx配置,和CDN上传新证书以及关联证书配置等(流程同上)。

参考

certbot申请通配符域名证书:https://www.jianshu.com/p/7b65cc562bc3
[转]部署Let’s Encrypt免费SSL证书&&自动续期:https://www.cnblogs.com/lzpong/p/6433189.html
Let’sEncrypt 免费ssl证书申请并自动续期:https://blog.csdn.net/c__chao/article/details/88368048
「Certbot」- ocsp.int-x3.letsencrypt.org Read timed out @20210201:https://blog.csdn.net/u013670453/article/details/113510018
Letsencrypt简单教程调整:https://blog.csdn.net/dancen/article/details/112571444
使用letsencrypt生成免费https证书:https://blog.51cto.com/lifeng/2564211

Your browser is out-of-date!

Update your browser to view this website correctly. Update my browser now

×